Portable Dish Pointing Angle Guide

If you use a dish that must be manually adjusted to get your DISH Outdoors service, such as a dish mounted on a tripod, you will need to adjust or repoint your dish to accommodate your new location and begin receiving signal.


Download a PDF of azimuth, elevation, and skew angles for pointing your portable dish:
Setup

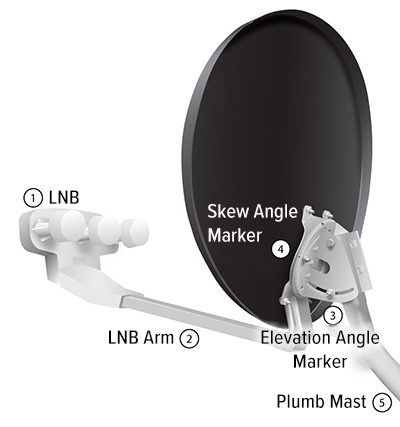
Refer to the image below to assist you with the following steps.

Parts of a satellite dish
  1. LNB: Receives and transfers signal
  2. LNB Arm: Arm from the dish to the LNB
  3. Elevation Angle Marker: Angle marker where the dish can be moved and tightened for the up and down (elevation) angle
  4. Skew Angle Marker: Angle marker where the dish can be moved and tightened for the rotation (skew) of the dish
  5. Plumb Mast Pole: the dish is mounted on

Note: Azimuth is not pictured as it is a full movement of the dish based upon the compass angle rather than a movement of a piece of the dish.

  1. Adjust the elevation angle marker up and down to get to the correct angle
  2. Tighten the bolt just until tight

  1. Adjust the skew angle marker left and right to get to the correct angle
  2. Tighten the bolt just until tight

  1. Use a compass to find the correct angle and move the plumb mast (the pole on which the dish is mounted) until the dish is pointing at that angle
  2. Check your signal strength: anything over 40 is a good signal
    • To find your signal strength on a Hopper or Wally receiver, go to Menu > Settings > Diagnostics > Dish
    • To find your signal strength on a ViP receiver, go to Menu > System Setup > Installation > Point Dish
  3. Tighten all hardware

For detailed video instructions on how to complete this setup, our partners  at dishformyrv.com have created a comprehensive playlist of YouTube videos that outline every step of the process. View all videos on YouTube.